Hello Everyone!
How Is Our Manor Today?
Venting & Spot Work
On Friday November 22nd, 2013 Justin and I decided that our next big step was to make the Spartan as water tight as possible. We have had bad experiences with water leeks in tents and in our pop up so we are determined to make this thing so water tight, it will double as a boat...just kidding ;) This is though a very long and important process. If you don't take your time and do it right, you could potentially ruin all of your hard work. Pay close attention to every detail and when in doubt, overkill isn't always a bad thing. We found our leek areas by spraying the top and sides of the Spartan with a hose.
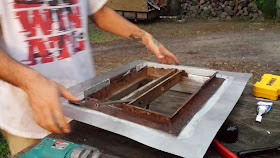
We first started our mission with the air vent in the front room. It was in very bad shape and we had contemplated taking all of them out and replacing them with new ones. The problem with that is RV vents are no longer made in the same dimensions that we need and we are trying not alter the frame or the outside aluminum as much as possible. we had also thought of taking the frame to a welder shop and have it rebuilt but that was not exactly cost efficient. So it was decided that we do it ourselves. We rebuilt the box that the vent sits in and the frame work as well.
Justin began by first measuring the air vent on the inside of the trailer which came out to be 16"x12". He drew up a design that when cut out would fold downward and, from the top of the trailer down into the hole for the vent, could be secured back into the frame work with rivets to hold it in place.
Some of the aluminum surrounding the vent was corroded, so Justin cut it out to be replaced. We kept in mind that this would need to be covered so we enlarged the dimensions to compensate for the loss.
using a rip saw gave a very precise cut
The existing areas where bent to create the new box to fit the air vent, as well as cover the new holes carved out from removing the damaged aluminum.
We then went about rebuilding the new frame on the vent itself. We attached new aluminum to some of the old aluminum that was still in good shape using rivets.

 The vent cover was in good shape but the hinge needed replacing. We took the old one off and used piano hinge to create a new one. we also riveted it into place using, what Justin called "Fat Boys".
The larger rivets held the larger Piano hinge
holes from the Piano hinge in
place; the stander size just
wouldn't cut it.
We used Loctite on both the vent and new box frame
This was our over kill, we used both spray and gel form of Loctite. Better to be safe then sorry.
We then placed the frame inside of the box and then riveted the whole thing together.
**Side Note**
The mosquitoes where, at this point, eating us alive!!!!! Note to self, buy OFF!!
After putting the lid back on, Justin went to the roof and just slid the whole thin into place to make sure that it fit correctly. he also used both types of Loctite to glue it into place, then riveted it to the roof and on the inside to keep it secure.
On November 23rd we mainly did spot work on the spry foam insulation, oh by the way, it took us about 50 cans to finish everything. We also mapped out where everything was going to go including plugs,lights, light switches, breaker box, counter tops and all furniture as well as appliances.
If you ever want to find stuff for a good price, Amazon is the way to go. We got this breaker box for $55 and its a house box that came with breakers. when we went to Lowes they where double the price and didn't come with anything other than the box itself. We mounted the box to the frame with self tapping screws.
Thank you so much for reading our blog!
we would love to hear from you as well so if you have any comments or questions
you can leave your comments below
or
like us on Facebook @: https://www.facebook.com/lifeinthebestmanor
or
contact us @: lifeinthebestmanor@gmail.com
more to come very soon!! ^_^


No comments:
Post a Comment